The FIG project is near completion! This is a project that is aimed at recreating a historic moveable typeface using 3D modeling and printing in connection with a block press to recreate the printing process. The goal is to engage faculty and students in a discussion, where they will be able to recall the steps in the printing process; identify a historic typeface; and discuss how technology can be used to resurrect a typeface.
As the project wraps up, I’d like to share the process.
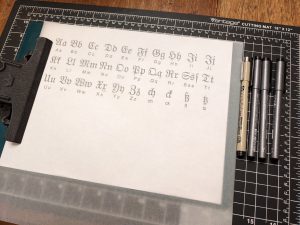
Working in the Archives and Special Collections Center and having access to numerable examples of different typefaces, I decided to recreate Fraktur one of the oldest typefaces. By researching some different type specimens, my first step was to create an outline of the letters. I printed out a guide and traced the letters making some edits to smooth out shapes and lines, onto paper which I then scanned into the computer.
From there I opened the scan in Photoshop to enhance the contrast of the scan. Using Curves and the black and white eye droppers is a quick way to make the scan into a black and white image while darkening and lightening specific areas. This method is successful when the tracing is clean, no smudging, and crisp lines. Tracing in ink is ideal especially with a superfine tipped marker.

Next was to open, or copy and paste, the edited scan in Illustrator. I would suggest opening the document in Illustrator so that you do not have both programs open and running which can cause them to crash. Once in Illustrator you can create a tracing of the edited scan. If all went well with editing the scan in Photoshop then the resulting tracing in Illustrator should yield a nicely rendered set of letters in black and white.
This is an important step because it creates vector shapes. Once you ungroup and delete the unnecessary white space and use the minus function to ensure letters have the appropriate shape cut out so that the O looks like an O and not a black circle. After that, it is time to save the file as an .svg which will then be uploaded to Fusion360.
Fusion360 offers free trials but is free to use for educators and students which is why I selected it for this project. I have also had previous experience using Fusion360 and other Autodesk software which played a part in my decision. In Fusion360, after inserting the .svg and finishing the sketch, select the shape, the letter should highlight, and under the Create tab select Extrude to extrude the shape. Once that is complete, you can add the base by selecting box and adding the box over the letter that has been extruded.
If you traced and scanned the way I did, the letter will be the correct way as opposed to backwards which is what you need. However, do not worry! If you navigate to the underside of your modeling, you will see that the letter is backwards so it’ll all work out in the end.
Once the letter is extruded and the base added, you can select the entire body, right click and hold to select Isolate. Doing this allows you to export the body to an .stl file. If you export without this step, you would export everything in the file. Afterwards, I always do Ctrl z to undo the Isolation.
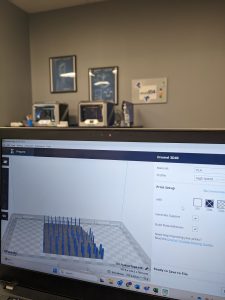
 You can find all exported files in your files within Fusion360. Here you can download all the .stl’s. While it’s tempting to go straight to printing, there is another step! At least there was for me as I was using a Dremel 3D printer. Using Dremel DigiLab Slicer you can open the .stl and set up your print. You’ll select the material, specify the quality of the print along with how much infill, build plate adhesion, and generate supports if your print requires it. There is also a mode to customize your print where you get more into the details of 3D printing. With all your details set, which includes orienting the file on the build plate, an important step that you shouldn’t forget. From there you can Prepare Slice followed by saving the file as a .gcode.
Using a USB drive, I plugged that into the printer and selected my file to print. From there the printer does its steps to orient itself and warm up while you’ll want to cross your fingers to make sure it all comes out okay!
The specs of the project will vary depending on a number of factors that are specific to your project such as the size of the letter itself and the size of the box that serves as the base of the letter. I tested a few before I came to the one that worked the best for myself and this project.
I started off small, which proved to be an issue. It is important to remember that 3D printers can only print so small. Small prints, especially those that rely on details, may lose those details in printing. I decided to increase the size to keep that detail. Furthermore, I realized I would be using these pieces in a workshop and having a larger example would be easier to show as opposed to the small one.
Here are my tests and their specs with the how they printed:
Test 1:
-
-
-
- Profile: High Speed (34 mm)
- Infill: 20%
- Generate Support: Yes
- Build Plate Adhesion: Yes
- Status: FAILED
- Letter: ENTIRE ALPHABET
-
-
Test 2:
-
-
-
- Profile: High Speed (34 mm)
- Infill: 20%
- Generate Support: Yes
- Build Plate Adhesion: Yes
- Status: SUCCESSFUL
- Size:
-
-
- Width: .5 inch (VARIES)
- Length: .34 inches
- Height: .5 inches
- Letter Height: .125 inches
-
-
- Letter: ENTIRE ALPHABET
-
-
Test 3:
-
-
-
- Profile: High Speed (34 mm)
- Infill: 20%
- Generate Support: No
- Build Plate Adhesion: Yes
- Status: SUCCESSFUL
- Size:
-
-
- Width: .5 inch (VARIES)
- Length: .34 inches
- Height: .30 inches
- Letter Height: .125 inches
-
-
- Letter: ONE LETTER
-
-
Test 4:
-
-
-
- Profile: High Speed (34 mm)
- Infill: 20%
- Generate Support: No
- Build Plate Adhesion: Yes
- Status: FAILED
- Size:
-
-
- Width: .5 inch (VARIES)
- Length: .34 inches
- Height: .30 inches
- Letter Height: .125 inches
-
-
- Letter: THREE LETTERS
-
-
Test 5:
-
-
-
- Profile: High Speed (34 mm)
- Infill: 20%
- Generate Support: No
- Build Plate Adhesion: Yes
- Status: FAILED
- Size:
-
-
- Width: .5 inch (VARIES)
- Length: .34 inches
- Height: .30 inches
- Letter Height: .125 inches
-
-
- Letter: ONE LETTER (FILLED IN B, HOLES NOT PRESENT)
-
-
Test 6:
-
-
-
- Profile: High Speed (34 mm)
- Infill: 20%
- Generate Support: No
- Build Plate Adhesion: Yes
- Status: SUCCESSFUL
- Size:
-
-
- Width: .5 inch (VARIES)
- Length: .34 inches
- Height: .30 inches
- Letter Height: .125 inches
-
-
- Letter: ONE LETTER C
-
-
Test 7:
-
-
-
- Profile: High Speed (34 mm)
- Infill: 20%
- Generate Support: No
- Build Plate Adhesion: Yes
- Status: FAILED
- Size:
-
-
- Width: .5 inch (VARIES)
- Length: .34 inches
- Height: .30 inches
- Letter Height: .125 inches
-
-
- Letter: ONE LETTER (FILLED IN B, HOLES NOT PRESENT)
-
-
Test 8:
-
-
-
- Profile: High Speed (34 mm)
- Infill: 20%
- Generate Support: No
- Build Plate Adhesion: Yes
- Status: SUCCESSFUL
- Size:
-
-
- Width: .5 inch (VARIES)
- Length: .5 inches
- Height: .5 inches
- Letter Height: . 5 inches
-
-
- Letter: ONE LETTER B (BUILT DIFFERENTLY IN FUSION360)*
-
- *Extrude the sketch which already had the holes.
-
-
-
Final:
-
-
-
- Profile: High Speed (34 mm)
- Infill: 20%
- Generate Support: No
- Build Plate Adhesion: Yes
- Size:
-
-
- Scale Design: 3.5
- Width: VARIES
- Length: 1.75 inches
- Height: .5 inches
- Letter Height: .5 inches
-
-
-
-