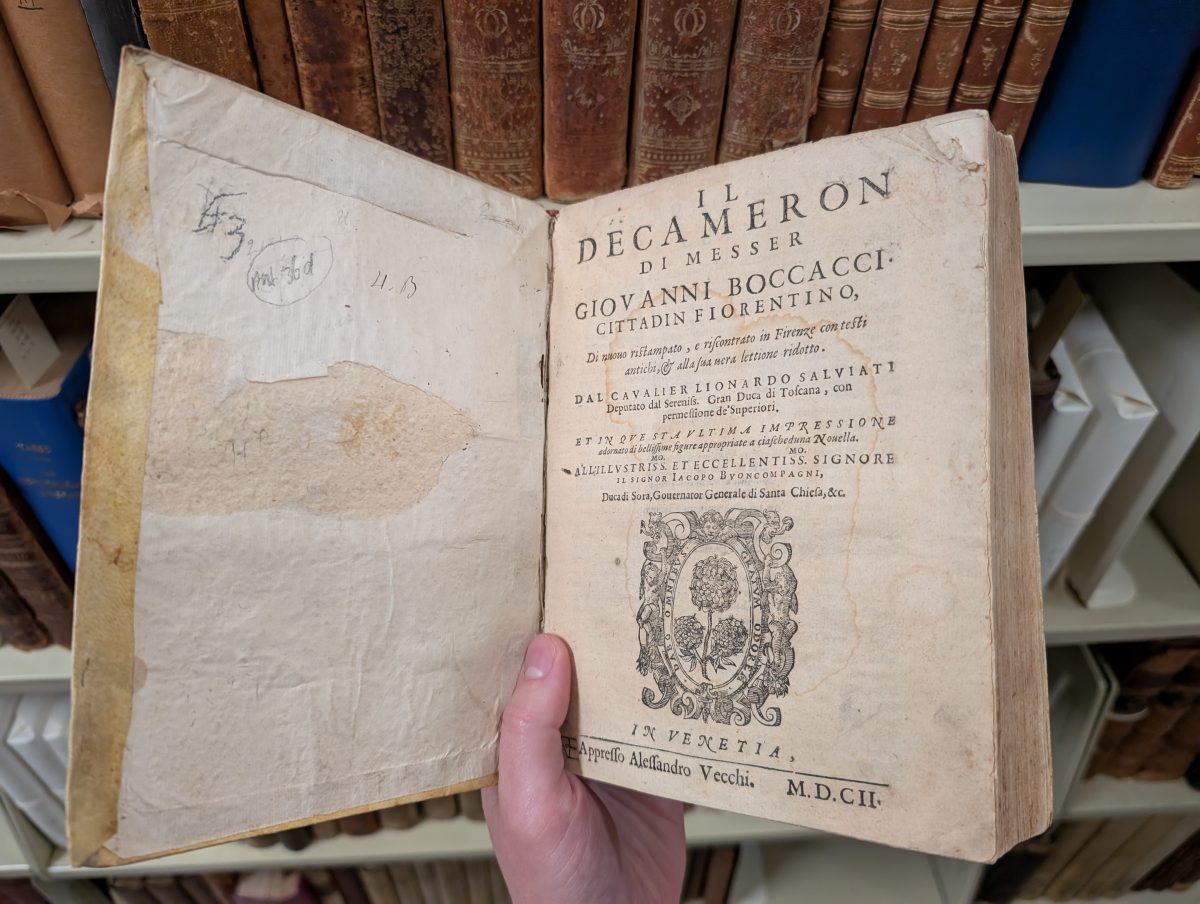
Facsimiles have been around for centuries. They tend to be an exact copy of a book, manuscript, or other item of historical interest, appearing as close to the original as possible in terms of size, color, and condition. For works on paper, early facsimiles were produced by hand through drawings, rubbings, engravings, and lithographs. By the nineteenth and twentieth centuries, facsimiles were produced using far more complex techniques and equipment as photographic processes developed. In the case of a book or manuscript, facsimiles appear as numbered limited-edition reproductions that can range from a partial to full reproduction right down to the very holes in the pages. Facsimiles are important research and teaching tools that allow researchers and students to closely examine items that would otherwise be difficult or impossible to consult in person due to location, condition, and access policies.
Within the Archives and Special Collections, there are a few facsimile editions of manuscripts, besides the well-known Book of Kells, that the Seton Hall community and researchers alike can view:
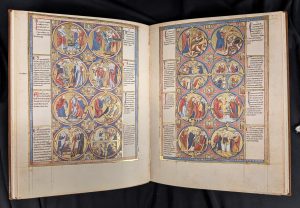
Bible Moralisée
The original Bible Moralisée was likely made in 1220s and is held in the Österreichische Nationalbibliothek of Vienna under the shelfmark Codex Vindobonensis 2554, referred to as Vienna 2554. Bible Moralisée, while acknowledge as a title of this work, is French for moralized Bible which is a name given to a distinct genre of Bible that began to appear in the thirteenth century. These Bibles did not include the full text and instead contained illuminated, gothic styled images as a way to interpret and explain scripture, often focusing on teaching morality. Typically, they were for private educational use such as instruction for French kings. While the complete history of Vienna 2554 is unknown, it is said that it could have been commissioned by Blanche of Castille, wife of Louis VIII, mother of Louis IX, and regent of France (1226-1234).
The facsimile is a full-size color reproduction of the entire one hundred and thirty folio original manuscript with trimmed pages according to the original format. The leather binding, differs and is modelled on a contemporary binding found in the Austrian National Library.
Buchaltärchen, Livre-autel (Book Altar of Philip the Good)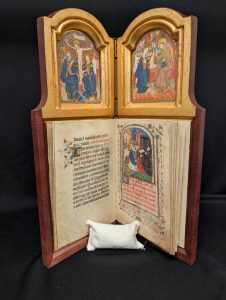
The Book Altar of Philip the Good is a painted diptych on panel, depicting the Trinty and the Coronation of the Virgin, and a Christian prayer book, that depicts portraits of Philip, Duke of Burgundy throughout the miniatures, that have been united to create a portable altar. The diptychs open the same as a book with edge decorated to resemble the pages of a book.
The original was created around 1430 and made exactly according to the personal wishes of the commissioner, Philip the Good. He used this daily for quiet devotion and mediation. This 76-page book contains five miniatures in addition to the diptych.
The facsimile is full-size color reproduction of the entire original document, attempting to replicate the look and feel of the original. Pages are trimmed according to the original format. It is bound in brown kidskin leather on wooden panels, decorated with blind tooling. The binding reproduces that of the original.
The Leningrad Codex
The Leningrad Codex is the oldest complete manuscript of the Hebrew Bibles in the Hebrew language using Masoretic text and Tiberian vocalization. It is housed in the Saltykov-Shchedrin State Public Library in St. Petersburg, Russia.
The facsimile edition was published in 1998 and is the first complete facsimile edition with 990 folio pages in black and white including 16 full-page color plates.
The Grandes Heures of Jean, Duke of Berry
The original Les Grandes Heures de Jean de Berry is a Book of Hours commissioned by Jean, Duke of Berry and is held by the Bibliothèque Nationale de France with the shelfmark ms. Lat. 919. This commissioned manuscript was painted by famous artists of the time and lavishly bound before being rebound and losing one image in 1930.
The facsimile within the collections is a partial facsimile of the original manuscript that does not reflect the format or look and feel of the original. The pages are represented on a larger white background but still conveys the grandeur of the original commissioned manuscript.
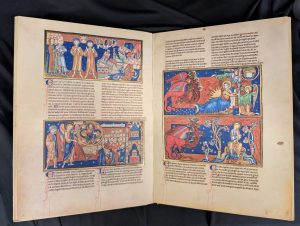
The Trinity College Apocalypse
The original manuscript, named for its repository, Trinity College, was believed to have been made around 1255-1260 in southern England, featuring the pictorial biography of Saint John the Evangelist with illuminated scenes of the Apocalypses.
The facsimile is a full-size color reproduction of the entire original manuscript and attempts to replicate the look-and-feel and physical features with trimmed pages.
Das Tierbuch des Petrus Candidus : Urb. lat. 276 : Geschrieben 1460, illuminiert im 16. Jahrhundert (The Book of Animals by Petrus Candidus, Codex Urbinus Latinus 276.)
The original Animal Book of Pier Candido, or Pietro Candido Decembrio, was written in Italy around 1460 by Pietro Candido (around 1399-1477 in Milan), a humanist scholar, author, secretary to numerous Renaissance princes, even worked at the chancery of Pope Nicholas V.
His Latin text describes natural history and the life of animals which was appended by an anonymous master around 1550 with over 200 bas-de-page miniatures. In total the book contains depictions of 496 animals, birds, and insects, some of which have gold and silver highlights. But it was just the natural world, satyrs and hybrids as well as other mythological creatures like the Pegasus depicted!
The facsimile is an exact reproduction of the original document in terms of extent, color and size with as much detail as possible to match the original book in terms of scope, format, and colors.
Gradual of St. Katharinenthal
The Gradual of St. Katharinenthal is a liturgical book that contains chants and notations that were sung in Latin during High Mass. The original manuscript came from the St. Katharinenthal Abbey near Diessenhofen in Switzerland and was completed in about 1312.
The facsimile is a full-sized color reproduction of the entire original manuscript including details such as the size and trimmed pages. The facsimile is bound in nappa leather and decorated with corner fittings, a central rosette, and clasps.
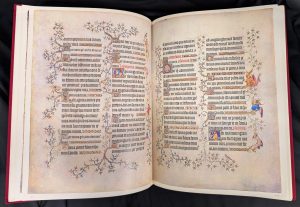
Bruges Hours Vat. Ross. 94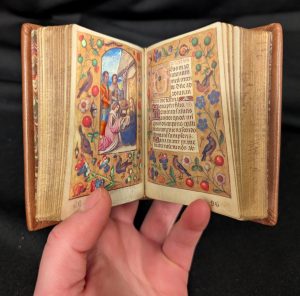
The Bruges Hours Vat. Ross. 94 is a Book of Hours that contains 39 full page illustrations, numerous golden miniatures, and realistic bordures that adorn the margins. The original located in the Vatican Library comes from Bruges near the end of the 15th century or beginning of the 16th century. It is believed there were three illuminators who worked on this text however, they remain unknown, adding an air of mystery to the creation to the Bruges Hours, as does the commissioner of this book.
The facsimile is an exact reproduction of the entire original document (extent, color and size) with as detailed as possible (scope, format, colors). The binding may not correspond to the original or current document binding.
A Vatican book of hours from the circle of Jean Bourdichon, Cod. Lat. Vat. 3781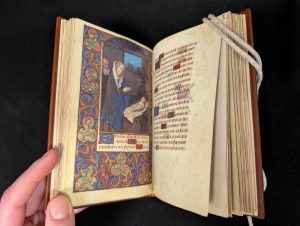
The original manuscript was created in France in the second half of the 15th century. It was crafted by master illuminator and court painter Jean Bourdichon with the assistance of his pupils for an unknown patron. The manuscript contains 17 full-page miniatures, borders, and over 1,200 ornate initials.
The facsimile is a full-size color reproduction of the entire original document, attempting to replicate the look-and-feel and physical features of the original document; pages are trimmed according to the original format. It is bound in red Morocco leather, decorated with gold tooling. The binding reproduces that of the original.
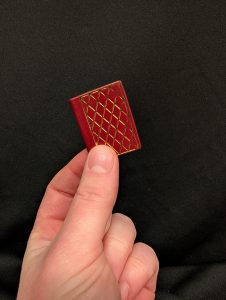
Masses of Saint Francis of Assisi and Saint Anne
The Masses of Saint Francis of Assisi and Saint Anne is the smallest facsimile in the Archives and Special Collections! Measuring 4 cm x 3 cm, this facsimile contains two missals, St. Francis of Assisi and Saint Anne. The original located at the Vatican, Vat. lat. 11254, was created in the 16th century by an unknown creator. This book features detailed miniatures with decorative elements on every page, detailed and written in gold ink. These small codices were intended to be carried on the person. As was this one, which would have been placed inside a small silver case that was suspended from a chain and worn around the neck.
The facsimile is a detailed reproduction of the entire document (size, format, color). The binding which is red leather with gold trim inside a silver slipcase (engraved with “A” on the front, “F” on the back) on a chain may not correspond to the original or current document binding.
If you would like to view these items for research, have them included as part of a class visit, or have further questions, please email archives@shu.edu